Ultimate Guide to Perfectly Preparing Your Turkey for Roasting
Essential Tools for Effective Turkey Trussing
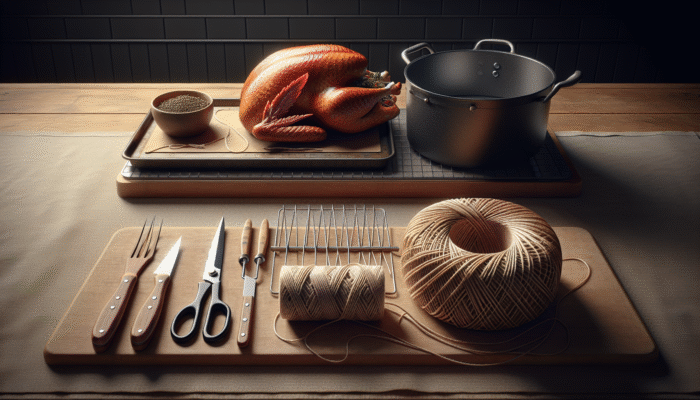
A successful initiation of trussing your turkey for roasting relies heavily on gathering all essential tools beforehand. The primary items you need include kitchen twine, scissors, and a roasting pan. Each of these tools plays a critical role in ensuring your turkey is tightly secured and ready for a perfect roast. When selecting kitchen twine, opt for a type that is both robust and flexible, as this will provide the necessary support to help maintain the turkey's form during the roasting process. Choose high-quality, food-safe twine to avoid any unwanted flavours that could affect the taste of the meat. Scissors are essential for cutting the twine to the appropriate lengths, allowing for a customized fit tailored to your turkey. Finally, a sturdy roasting pan not only secures the bird but also collects all those delectable drippings, which are perfect for making a rich gravy.
When selecting your roasting pan, it’s vital to consider the size of your turkey; a pan that's too small can lead to spillage or uneven cooking, which may compromise the quality of the final dish. Many experienced cooks prefer to use a rack inside the pan to elevate the turkey, promoting better circulation of hot air around the bird and ensuring consistent cooking results. With these indispensable tools at your disposal, you are well-prepared to embark on a rewarding and successful turkey roasting experience that will undoubtedly impress your family and friends.
Creating a Neat and Organised Workspace for Trussing Your Turkey
Establishing an organised workspace is crucial when learning how to truss a turkey for roasting. Start by clearing a spacious area on your countertop, allowing for free movement and the ability to navigate around the turkey without any obstructions. Maintaining a clean and tidy environment enables you to focus on the task at hand, significantly reducing the likelihood of errors during the trussing process, which can be complex if not approached carefully.
It’s advisable to position all necessary tools within easy reach, including the turkey, twine, and scissors. This strategic arrangement minimizes unnecessary movement, helping you maintain your rhythm as you work efficiently. Additionally, having paper towels readily available can be invaluable for cleaning up spills or managing raw turkey, which requires strict hygiene practices. An efficiently organized workspace not only boosts your productivity but also fosters a stress-free cooking atmosphere, allowing you to enjoy your time in the kitchen without the anxiety of being rushed or overwhelmed.
Conducting a Thorough Inspection of Your Turkey for Quality Assurance
Prior to embarking on the trussing technique, it is essential to conduct a meticulous inspection of your turkey to ensure its quality. Many turkeys come with giblets or the neck tucked inside the cavity; checking for these components is crucial as it prepares you for both trussing and utilizing every part of the bird. The giblets can be transformed into a rich broth, which adds depth and flavor to your gravy or stuffing, while the neck can be roasted or simmered to create a delightful stock that enhances your meal.
During your inspection, be vigilant for any remaining feathers or impurities on the skin. A clean turkey is essential for achieving an impressive presentation once roasted. Moreover, if the turkey has been frozen, it is imperative to ensure that it is completely thawed before cooking. A thoroughly inspected turkey not only leads to a more enjoyable roasting experience but also enhances both flavor and final presentation, ensuring your kitchen efforts result in a beautifully cooked dish that your guests will rave about.
Setting the Oven to the Optimal Temperature for Roasting Your Turkey
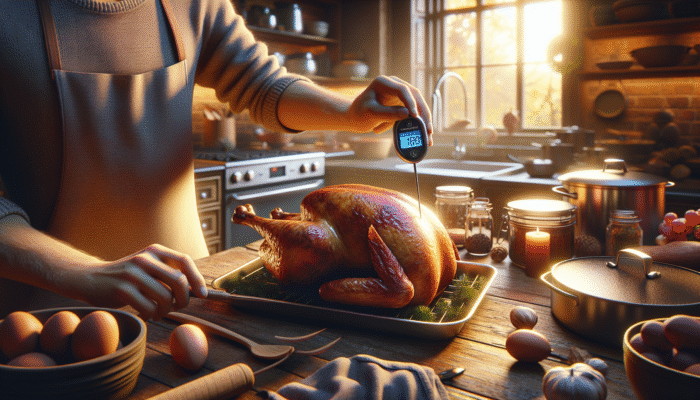
Before you begin the roasting process, it is crucial to ensure your oven is preheated to the ideal temperature, typically around 180°C. Achieving the correct temperature is fundamental to the overall success of your dish, as it promotes even cooking and helps prevent the turkey from drying out during the roasting process, which is vital for ensuring flavorful meat that everyone will enjoy.
While the oven is heating, consider employing an oven thermometer to check the accuracy, since some ovens may have inconsistencies in temperature readings. Once your oven has reached the designated preheated state, you can confidently place your turkey inside, assured that it will cook thoroughly. This essential step not only streamlines your cooking process but also significantly contributes to achieving that highly sought-after golden-brown finish that is often desired in a perfectly roasted turkey, elevating your culinary efforts to new heights.
Key Techniques for Trussing Your Turkey Effectively
Expertly Tucking the Wings for a Neat and Secure Finish
The first step in mastering how to truss a turkey for roasting involves deftly tucking the wings. This technique not only secures the wings in position but also protects them from burning during the roasting process. To begin, gently lift each wing and tuck it beneath the turkey's body. This positioning aids in maintaining a compact shape, which is crucial for even cooking and achieving an attractive presentation on your dining table.
Tucking the wings also contributes to a refined overall appearance. A beautifully shaped turkey is always more appealing when served, enhancing the dining experience for your guests. Moreover, this method allows heat to circulate evenly around the bird, ensuring that every bite is succulent and perfectly cooked. Remember, a well-tucked turkey not only looks professional but also cooks to perfection, making this step vital in your roasting journey, ensuring a delightful meal.
Tying the Legs Together for Stability and Consistency in Cooking
Next, focus on tying the legs together, a critical aspect of the trussing process. Utilizing your kitchen twine, bring the legs together at the ankles, forming a secure yet comfortable knot. This technique not only creates a compact shape, which is essential for even cooking, but also prevents the legs from separating during the roasting process, ensuring a consistent cook throughout the entire bird.
Consider employing a double knot for added security, ensuring that your turkey maintains its shape while it cooks. A well-tied turkey not only looks appealing but also allows heat to penetrate evenly, guaranteeing that both the white and dark meat are cooked to perfection. When executed correctly, this technique ensures that your turkey retains its moisture and flavor, delivering a delicious meal that your guests will rave about for years to come.
Stabilising the Body for Optimal Roasting Results
After tucking the wings and tying the legs, it’s time to secure the body of the turkey. Using the kitchen twine, wrap it around the turkey several times to create a firm hold. This step is crucial for maintaining the bird's shape during the roasting process, preventing it from sprawling out and cooking unevenly, which can lead to dry, overcooked meat that no one wants to experience.
As you wrap the twine, consider crisscrossing it for additional support, which enhances both the structure and presentation of your turkey. This technique allows the skin to brown beautifully while ensuring that the meat remains juicy and flavorful throughout the cooking process. A well-secured turkey not only looks fantastic on the serving platter but also ensures a delicious meal that your family and friends will thoroughly enjoy, making this step critical in your trussing technique.
Correctly Positioning the Neck Flap for Seamless Roasting
Positioning the neck flap accurately is another essential aspect of how to truss a turkey for roasting. You can either tuck the neck flap under the body of the turkey or secure it in place using a skewer. This step is vital for preserving the overall shape and integrity of the bird during the cooking process, ensuring that it roasts evenly and thoroughly.
Tucking the neck underneath helps to retain moisture, directly contributing to a juicy final product that will impress your guests. If you choose to use a skewer, ensure it is securely fastened to prevent any movement during the roasting process. Properly positioning the neck not only enhances the appearance of your turkey but also promotes even cooking, ensuring that every part of the bird reaches the ideal internal temperature without drying out, ultimately leading to a successful meal.
Utilising a Trussing Needle for Advanced Trussing Techniques
For those who wish to adopt a more advanced method, utilizing a trussing needle can significantly elevate your trussing technique. Threading kitchen twine through a trussing needle allows you to sew up the cavity of the turkey, ensuring that any stuffing remains securely inside while cooking. This method is particularly beneficial if you're preparing a stuffed turkey, as it prevents any stuffing from leaking out during the roasting process and creates a beautifully cohesive dish.
When inserting the needle, start at the back of the cavity and pull the thread through, ensuring a tight yet gentle grip. This technique not only secures the stuffing but also promotes an even cooking environment, allowing heat to circulate within the turkey effectively. A tightly trussed turkey guarantees that every bite is flavorful and succulent, delivering a wonderful dining experience for all your guests and showcasing your culinary prowess.
Advanced Techniques for Masterful Turkey Trussing
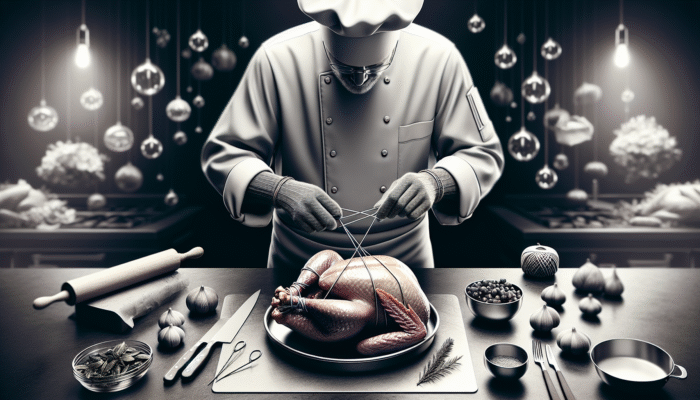
Mastering the Cross-Stitch Trussing Technique for Aesthetic Appeal
Enhancing your trussing skills with how to truss a turkey for roasting can involve advanced techniques like cross-stitch trussing. This method not only offers added security but also results in an aesthetically pleasing finish that will surely impress your guests. To execute a cross-stitch design, begin by tying the legs together, similar to basic trussing techniques.
Once the legs are secured, take the twine and create a cross pattern over the body of the turkey, weaving it in and out of the skin. This method not only holds the turkey in place but also encourages uniform cooking, as the twine supports the skin and meat throughout the roasting process. The visual impact of a cross-stitched turkey can elevate your presentation, leaving a lasting impression at any gathering or celebration, making your meal the highlight of the occasion.
Notably, employing this technique requires a bit of practice, but the results are well worth the effort. A beautifully trussed turkey not only showcases your culinary skills but also enhances the overall dining experience, making it a valuable skill for any home cook looking to impress their guests with their attention to detail and presentation.
Quick and Efficient Butterfly Trussing Method for Faster Cooking
Butterfly trussing is an excellent technique for those seeking a quicker cooking method. This approach involves removing the backbone of the turkey, allowing it to flatten, which significantly reduces cooking time. Start by laying the turkey breast-side down on your cutting board and carefully cutting along both sides of the backbone using kitchen scissors or a sharp knife.
Once the backbone is removed, flip the turkey over and press down firmly on the breast to create a flat surface. With the turkey now in a butterflied position, you can easily truss it by tying the legs together and securing the wings under the body. This technique not only expedites the cooking process but also enhances the caramelization of the skin, resulting in a deliciously crispy exterior that is sure to please everyone at your table.
Butterfly trussing can also significantly modify the presentation of your turkey. The flat shape allows for more even browning and creates a stunning visual display when served. Perfect for gatherings, this method ensures that every bite of your turkey is juicy and flavourful, making it a popular choice among seasoned cooks who want to leave a lasting impression on their guests.
Creating Visual Appeal with Lattice Trussing for Stunning Presentation
For those looking to combine functionality with visual appeal, lattice trussing is an excellent choice when mastering how to truss a turkey for roasting. This technique involves weaving twine in a lattice pattern across the turkey's body, creating a beautiful and intricate design that is sure to capture attention and admiration from your guests.
To start, secure the legs and wings as you would with basic trussing. Next, take a length of kitchen twine and begin weaving it over and under the body of the turkey, forming a lattice. This not only secures the turkey effectively but also allows for better heat circulation, promoting even cooking and ensuring a beautifully browned skin that will wow your guests and elevate your dining experience.
The finished result is visually striking, making your turkey the centerpiece of the dining table. A well-lattice-trussed turkey not only looks impressive but also ensures that the meat retains its moisture and flavor throughout the cooking process. This technique is perfect for special occasions, showcasing your culinary creativity and attention to detail, making every meal memorable and enjoyable for everyone.
Enhancing Security with Spiral Trussing for Robust Results
If you're eager to enhance both the security and presentation of your turkey, spiral trussing is a fantastic method to explore. This technique involves wrapping the twine around the turkey in a spiral pattern, creating an elegant and unique appearance. To begin, tie the legs together and tuck the wings underneath as you normally would.
Starting at the base of one leg, wrap the twine around the turkey in a spiral motion, gradually working your way up to the breast. As you wrap, ensure that the twine is snug but not overly tight, as this will help maintain the turkey's shape while allowing for even cooking. The spiral design not only secures the bird effectively but also adds a touch of sophistication to your presentation, ensuring your turkey looks professionally prepared.
Spiral trussing can be particularly beneficial for larger turkeys, as it ensures that all parts of the bird receive equal exposure to heat. The result is a beautifully roasted turkey, complete with golden-brown skin and juicy meat that your guests will love. This technique not only elevates your culinary skills but also impresses guests with its stunning presentation, making it a worthwhile addition to your culinary repertoire.
Achieving a Compact Shape with Tuck and Fold Trussing Technique
Another effective method in your trussing arsenal is tuck and fold trussing, perfect for maintaining a compact shape during cooking. To begin this technique, tuck the wings underneath the turkey's body, then fold the legs back towards the body. Once positioned, use kitchen twine to securely tie the legs together, ensuring they stay in place while cooking.
This method is particularly useful for achieving an even cook, as the compact shape allows for better heat circulation within the bird. Additionally, tucking the wings helps prevent them from drying out or burning, ensuring that every part of your turkey remains succulent and juicy throughout the roasting process, leading to a delightful final dish that will impress your guests.
Not only does this technique support even cooking, but it also contributes to a polished and professional appearance on your serving platter. A neatly trussed turkey is bound to impress guests, setting the stage for a memorable dining experience. With tuck and fold trussing, you can achieve a beautifully roasted turkey that will be the highlight of any gathering, ensuring that your efforts in the kitchen are well recognized and appreciated.
Avoiding Common Trussing Mistakes for a Perfect Turkey
Preventing Over-Tightening of Twine for Consistent Cooking
One of the most prevalent mistakes when learning how to truss a turkey for roasting is over-tightening the twine. While it may seem logical to pull the twine taut for added security, doing so can lead to uneven cooking. An excessively tight truss can constrict the turkey's body, hindering proper heat circulation and potentially resulting in dry meat, which can ruin your carefully prepared meal and disappoint your guests.
Instead, aim for a snug hold that keeps the skin and meat in place without cutting into the flesh. This allows the turkey to cook evenly, ensuring that both the breast and thigh meat reach the perfect level of doneness. A well-trussed turkey should retain its shape while allowing for the natural expansion that occurs during cooking, creating a deliciously moist final product that will delight your guests and elevate your meal.
To avoid this mistake, practice your technique with a smaller chicken or similar-sized bird before tackling a larger turkey. Understanding the right tension for your trussing twine will enhance your skills and yield a perfectly cooked turkey every time, ensuring your culinary efforts result in a meal everyone will remember and enjoy.
Avoiding Improper Wing Positioning for Optimal Cooking Results
Another common error is neglecting the proper positioning of the wings. If the wings are not tucked correctly, they can easily become burnt or overly dried out during roasting, which detracts from the overall quality of your dish. Proper wing positioning is essential for both the cooking process and the overall presentation of your turkey.
When tucking the wings, remember to place them securely under the body of the turkey. This position helps prevent them from flopping about, which can lead to uneven cooking and an unappealing appearance. A well-tucked wing not only ensures that it cooks evenly alongside the rest of the bird but also contributes to a polished look when served, enhancing the overall dining experience for your guests.
To perfect this technique, take the time to practice tucking the wings before attempting your turkey. A little experience goes a long way in helping you avoid this common mistake, paving the way for a beautifully roasted turkey that will impress everyone at your gathering.
Addressing the Neglect of the Tail for a Complete Presentation
A lesser-known trussing mistake involves neglecting to secure the tail. Failing to do so can compromise the shape and presentation of the turkey, resulting in a less than desirable appearance on the serving platter. The tail area can be particularly susceptible to burning, which can detract from the overall look of your beautifully roasted bird and diminish its appeal.
To avoid this, ensure that the tail is securely tucked or tied in place as you truss the rest of the turkey. Using kitchen twine, you can create a simple knot to hold the tail down or tuck it under the body like the wings. This technique not only preserves the integrity of the turkey's shape but also supports even cooking throughout the bird, allowing for a consistently delicious outcome that will impress your guests.
When considering the overall presentation, remember that attention to detail matters. A well-trussed turkey, complete with a securely positioned tail, will undoubtedly impress your guests and elevate your dining experience, showcasing your culinary expertise and care for your meal, making it a memorable occasion.
Ensuring the Neck Skin is Tucked for Maximum Moisture Retention
One critical aspect often overlooked in the trussing process is tucking the neck skin under the body. Neglecting this step can lead to moisture loss, resulting in a dry turkey by the time it's ready to serve. Tucking the neck skin helps to trap steam and flavor, contributing to a juicier final product that everyone will appreciate and enjoy.
To incorporate this technique, simply fold the neck skin under the turkey before completing your trussing. This small but significant step can make a substantial difference in the overall taste and presentation of your bird. A well-cooked turkey should not only be visually appealing but also bursting with flavor and moisture, providing a delightful meal for all your guests, enhancing their dining experience.
To further elevate the dining experience, consider using the neck and giblets to create a rich gravy or stock. By utilizing every part of the turkey, you not only minimize waste but also enhance your meal, ensuring a delightful dining experience for everyone around the table, highlighting your culinary skills.
Exploring Trussing Tools and Their Alternatives
Reliable Kitchen Twine for Effective and Secure Trussing
When it comes to trussing, kitchen twine remains the traditional and most reliable choice. Its combination of strength and flexibility makes it perfect for holding the turkey's shape during roasting. High-quality kitchen twine will withstand the oven's heat, ensuring that the turkey remains securely tied throughout the cooking process without any risk of breaking or melting.
When selecting twine, look for food-safe options that won't impart any unwanted flavors to your bird. Avoid synthetic materials, as they can melt or release harmful chemicals when exposed to high temperatures. Natural cotton twine is the best choice, providing both safety and durability for your cooking needs while allowing for easy handling during the trussing process, making it a reliable tool in your kitchen.
While kitchen twine is versatile and effective, it does require some skill to master the various trussing techniques. With practice, you’ll find that using twine becomes a seamless part of your cooking routine, contributing to beautifully roasted turkeys time and again, ensuring your meals are consistently impressive and delightful for your guests.
Convenient Silicone Bands as a Modern Alternative for Trussing
For those seeking a reusable alternative to traditional twine, silicone bands have gained popularity in recent years. These bands offer an easy-to-use solution for trussing, simply stretching around the turkey to hold its shape securely. They are also dishwasher safe, making cleanup a breeze after your cooking session, which is especially beneficial for busy cooks.
However, while silicone bands are convenient, they may not provide the same level of support as kitchen twine. When using these bands, always ensure they are securely fastened to prevent any slipping or loosening during the roasting process. Additionally, some may prefer the traditional aesthetic of twine when serving, as it adds a classic touch to your presentation that can enhance the overall dining experience and make your meal feel more special.
Incorporating silicone bands into your trussing arsenal can offer added flexibility, particularly for those who may not have the confidence to master twine techniques. They also represent an eco-friendly choice for the environmentally conscious cook looking to reduce waste while still achieving excellent results in the kitchen, making them a valuable addition to your cooking tools.
Using Metal Skewers for Additional Security During Roasting
Metal skewers can be a useful tool for securing the shape of the turkey during roasting, although they offer less flexibility than twine. These sturdy implements can be used alongside kitchen twine or silicone bands for added security, particularly when it comes to holding the wings and tail in place during the cooking process, ensuring everything stays in position for even cooking results.
When using metal skewers, be sure to insert them at an angle, allowing for a snug fit without risking damage to the turkey's skin. This technique will help maintain the overall shape and prevent any parts from burning during cooking, ensuring a beautifully roasted turkey that you can serve with pride and confidence.
While metal skewers may not be the traditional choice for trussing, they can serve as an effective backup plan for those who wish to enhance the stability of their turkey. Combined with other methods, they contribute to a beautifully roasted bird that is sure to impress your guests at the table, making your meal memorable and enjoyable for everyone.
Understanding the Advantages of Trussing Your Turkey for Better Results
Guaranteeing Even Cooking for Optimal Results in Your Turkey
One of the primary benefits of learning how to truss a turkey for roasting is achieving even cooking throughout the bird. Trussing helps to maintain the turkey's shape, allowing for uniform heat distribution that is essential for larger turkeys, where different parts can cook at varying rates without proper trussing in place.
When the turkey is compactly secured, heat can circulate effectively, ensuring that both white and dark meat reach the perfect level of doneness. A well-cooked turkey results in tender, juicy meat, free from the dreaded dry or rubbery texture that can occur when cooking is uneven. Proper trussing makes all the difference in ensuring a successful roast that everyone will enjoy and appreciate.
Moreover, even cooking enhances the overall flavor of the turkey, as it allows the natural juices to remain intact. This means every bite is full of delicious flavor, making your meal a delightful experience for everyone gathered around the table, ensuring that your efforts in the kitchen are rewarded with rave reviews and satisfied guests.
Improving Presentation for Special Events and Gatherings
A trussed turkey not only cooks better but also looks significantly more appealing when served. A neatly tied turkey with properly positioned wings and legs is bound to impress guests and elevate the overall dining experience during festivities and gatherings, making your meal feel even more special and memorable.
When it comes to celebrations, presentation plays a crucial role in setting the mood. A beautifully roasted turkey can serve as the centerpiece of your table, showcasing your culinary skills and attention to detail. The visual appeal of a well-trussed bird can create an atmosphere of celebration, making your meal all the more memorable for your guests and enhancing the enjoyment of the occasion.
Additionally, a well-presented turkey signals the care and effort put into the meal, showing your guests that you value their dining experience. A polished appearance speaks volumes, making the trussing process a worthwhile investment in any festive gathering, ensuring that everyone appreciates the special effort you put forth to create a delicious and visually stunning dish.
Retaining Moisture for Flavorful Outcomes in Your Turkey
When learning how to truss a turkey for roasting, one of the most significant benefits is the retention of moisture during cooking. Trussing helps to keep the turkey compact, allowing the natural juices to circulate within the bird. This leads to a succulent, juicy final product that is bursting with flavor and satisfies every palate at your table.
By holding the turkey together, trussing prevents overexposure of the meat's surface to the dry oven air. As a result, the turkey remains moist, ensuring that every bite is tender and flavorful. A well-trussed bird can transform your meal, creating a memorable experience for your family and friends that they will cherish and enjoy.
In addition to moisture retention, trussing can also enhance the flavor profile of your turkey. With the juices kept contained, the meat absorbs the spices and seasonings you apply, resulting in a deliciously seasoned roast that is sure to impress everyone at the table and elevate your culinary reputation, making every gathering special.
Frequently Asked Questions About Turkey Trussing
What does it mean to truss a turkey?
Trussing a turkey involves tying the bird's legs and wings to hold its shape during roasting, ensuring even cooking and enhancing the overall presentation of the dish for a delightful dining experience that everyone can enjoy.
Why is it important to truss my turkey?
Trussing helps retain moisture, promotes even cooking, and improves presentation, creating a more succulent and visually appealing dish for your guests to enjoy during special occasions and gatherings, making your meal memorable.
Can I use alternatives to kitchen twine for trussing?
Yes, silicone bands and metal skewers can serve as effective alternatives for trussing, providing different levels of security and ease of use during the roasting process, allowing for flexibility in your cooking approach and enhancing your kitchen experience.
How can I tell if my turkey is fully cooked?
The internal temperature of the turkey should reach 75°C when measured at the thickest part of the thigh without touching the bone to ensure it is safely cooked and ready to serve to your guests, guaranteeing a delicious meal.
Is it necessary to remove the giblets before roasting my turkey?
Yes, removing the giblets is essential for proper trussing, and they can also be used to create a flavorful broth or gravy to accompany your meal, minimizing waste and enhancing the overall dining experience for everyone at the table.
How long should I let the turkey rest after cooking?
Allow the turkey to rest for at least 20-30 minutes after cooking. This resting period helps the juices redistribute, ensuring moist and tender meat that will delight your guests when it’s time to serve, enhancing their enjoyment of the meal.
Can I truss a turkey without using a needle?
Absolutely! You can truss a turkey using just twine by tying the legs and wings securely, or you can use skewers for additional support if needed, allowing for versatility in your trussing methods and enhancing your cooking experience.
What happens if I forget to truss my turkey?
If you forget to truss your turkey, it may still cook well, but it might not retain its shape, leading to uneven cooking and a less visually appealing presentation on the table, which could detract from your meal and overall dining experience.
How can I simplify my trussing process?
Practicing with smaller birds like chickens can help you gain confidence in your trussing technique, making it easier when preparing a larger turkey for roasting and ensuring that your skills improve over time, leading to consistently delicious results.
Is it possible to truss a frozen turkey?
No, it’s important to thaw the turkey completely before trussing. A frozen turkey cannot be effectively trussed, which can lead to uneven cooking results that will affect the quality of your meal and your guests' enjoyment.
Connect with us on Facebook!
The post How to Truss a Turkey for Roasting: A Step-by-Step Guide appeared first on https://cookinggods.com
The Article Trussing a Turkey for Roasting: Step-by-Step Instructions Was Found On https://limitsofstrategy.com
The Article Trussing a Turkey: A Simple Guide for Perfect Roasting First Appeared ON
: https://ad4sc.com


No responses yet